This is especially important for executing workflows where other models are needed, e.g., a role model to send the tasks to specific people. The basic procedure to add a model to a task is quite the same as most of the other models. Therefore, it is explained once, and can be done for every following model:
- Role Model
- Domain Model
- IT-System Model
- Risk Model
- Document Model
Basic Assigning Procedure
The procedure will be explained with a role model as an example. First off you have to open the Quad Menu with a right-click on the specified task. In the Add section, all the different parts you can add to the task are now displayed. You can either choose the one you want, or you click any of these and change the type in the opening top dialog (2 dialogs will open).

![]()
By clicking one of these icons, the displayed models change.
Double-click the model you wish to add and then save it with a click on OK. The dialog closes and the chosen model is preselected so all available roles in this model are displayed. By double-clicking the role, you add it. Click OK to save.

After finishing the task looks like this:

The role is displayed directly in the task, but the other added things like documents or risks will be displayed as an attachment. With the other models, you also have the possibility to declare them as in- or output, which changes the way it will be displayed after adding.

Select User in Charge
If you need a specific person to get the tasks you can also define them with the Select User in Charge functionality. You might now think if it is possible that way why do I even use a role model? This question can be answered easily. You mostly don't use a role model just once if it is properly structured and reflects your intern organization. So if you have a role model for specific departments in your company then you just have to add that role model and not a single user. So with Select User in Charge you have to add a user for every task who needs them again. In addition to that, it is only possible to select one user in charge.
To do so, you have to open the Quad Menu of the task and choose Select User in Charge. There are two different ways to add a User in Charge you can either select them from the Active Directory or you add a dynamic user. The dynamic user will only be known for the execution, which means you have a process where the supervisor of an employee should be notified. The supervisor can be different for any employee, so the responsible supervisor is stored in a field. That field can be selected when configuring the user in charge.
Note: If there is no specific user assigned to a task or any other element, then the users of the assigned role will be used for sending tasks.
Add an Active Directory User
Enter at least 3 letters of the name or username of the user you want to add. With pressing the Return key, you will see if there are any users who fit the typed name. Select one and click OK to save.


With the Send information mail to these email addresses option, you are able to send the task to the entered email addresses.
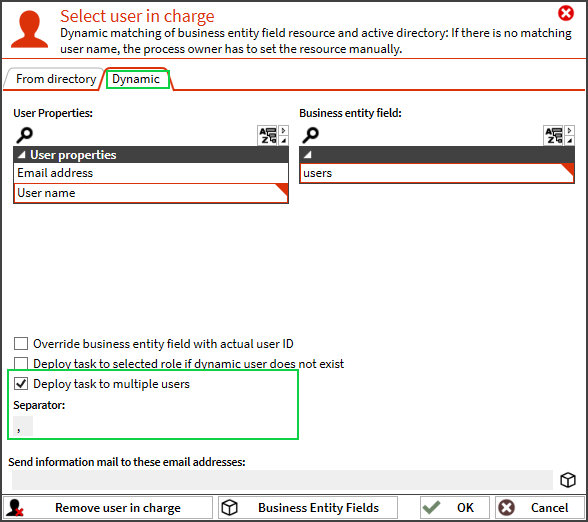
Add a Dynamic User
To add a dynamic user, you have to switch to the Dynamic tab and choose whether the User name or the Email address is contained in the field. You can now choose the field with the user data in it from the already added business entity or workflow variables. If there are none of these existent, you can manage Business Entity Fields by clicking on the equally named button.
In the dialog are a few other things you can configure, such as the deployment of the task if the selected user doesn't exist.
There is also the possibility to specify multiple dynamic users, by selecting the checkbox Deploy task to multiple users and define a separator (in case you do not define a separator ';' will be used by default). Upon deployment, all values provided will be resolved to users and groups as they would for a single user and the task will be deployed to all resolved users.
Select Participants
Participants are only for modeling purposes, they have no deeper meaning. If a participant is assigned to a task it only shows how the specified role is concerned of that task, but other than that it doesn't mean that there is also sent the task to this user. With adding a participant you can specify which responsibility the participants have in form of the RACI model.
- R = Responsible
- A = Accountant
- C = Consulted
- I = Informed
To add a participant right-click a task and choose the Select Participants. All available and referenced roles will be displayed and can be added with double-clicking the name. Now you can enter the responsibility of the role and save with clicking the OK button.
