To start, you have to create a list in SharePoint and then the list needs to be mapped to a business entity in FireStart.
Create a Custom List for Travel Expense Reports
Create a new app (custom list) named travel expense list inside a SharePoint site collection. Note: The field title was renamed to “travel purpose”. Follow the steps below:
- Select the List Ribbon on the Menu Bar and open the List Settings.
- Select Create Column.
- Create columns according to the following screenshot.
Field name - Field type - required
- Title/Travel purpose – Single line of text – yes
- Travel date – Date and Time – no
- Point of departure - Single line of text – yes
- Point of arrival - Single line of text – yes
- Mileage - Single line of text – yes
- Travel time - Single line of text – yes
- Status - Single line of text – no

Select the list from the left navigation and copy the URL to your clipboard.
e.g. http://pro-demo/websites/tutorial/Lists/Travel Expense List/AllItems.aspx
Create a Business Entity for SharePoint List
Select the BUSINESS ENTITY designer and create a new model by clicking New Model in the top ribbon menu Main.

Drag and drop a Business entity element on the canvas and name it Travel expense list.
Right-click the business entity element and select Field definitions.

Select the Mappings tab and click Add.

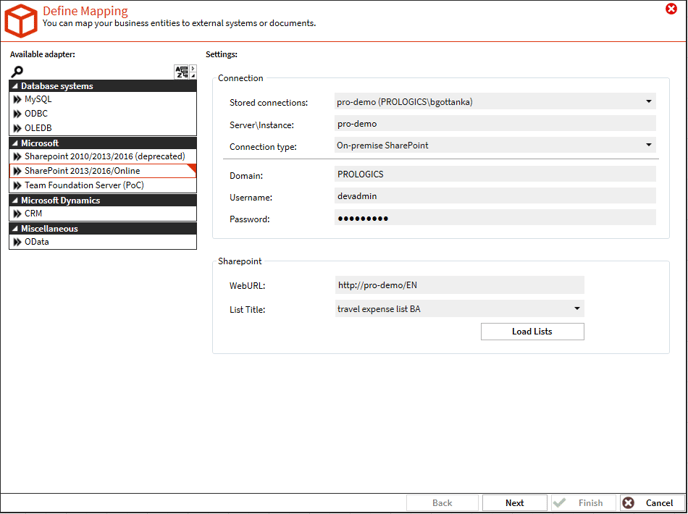
Select the SharePoint 2013/2016/Online adapter, enter the required information and paste the copied URL to your travel expense list. Click Next.

Drag and drop the required fields from the left to the right side or simply double-click the required fields on the left side to add them. Click Finish when done.

You just created your first business entity mapping.

Click OK to close.
Select Save from the top ribbon menu Main, select a scope, give the model a name, and click Save.

